


High-Performance Computing (HPC) workloads—such as Slurm scheduling, BeeGFS distributed storage, MPI job execution, and cluster-wide configuration management using Ansible—require low-latency, secure, and predictable node-to-node communication. While cloud providers or VPS platforms may not always offer a flat private network, you can easily build your own full-mesh Layer-3 VPN using WireGuard, enabling a consistent internal network topology across all nodes.
This article walks through the complete process of building a 3-node full-mesh WireGuard VPN.
The walkthrough includes installation, key management, configuration, routing, firewall adjustments, and cluster-level considerations.
Although the example uses three nodes (node01, node02, node03), the architecture scales to dozens of nodes.
1. Overview of the Architecture
WireGuard creates encrypted point-to-point tunnels between each pair of nodes. In a full-mesh configuration:
- Every node has a direct encrypted tunnel to every other node.
- All nodes communicate via a common internal subnet (
10.0.0.0/24). - The topology supports distributed storage (BeeGFS), job schedulers (Slurm), MPI, and management tools (Ansible or Terraform).
Architecture
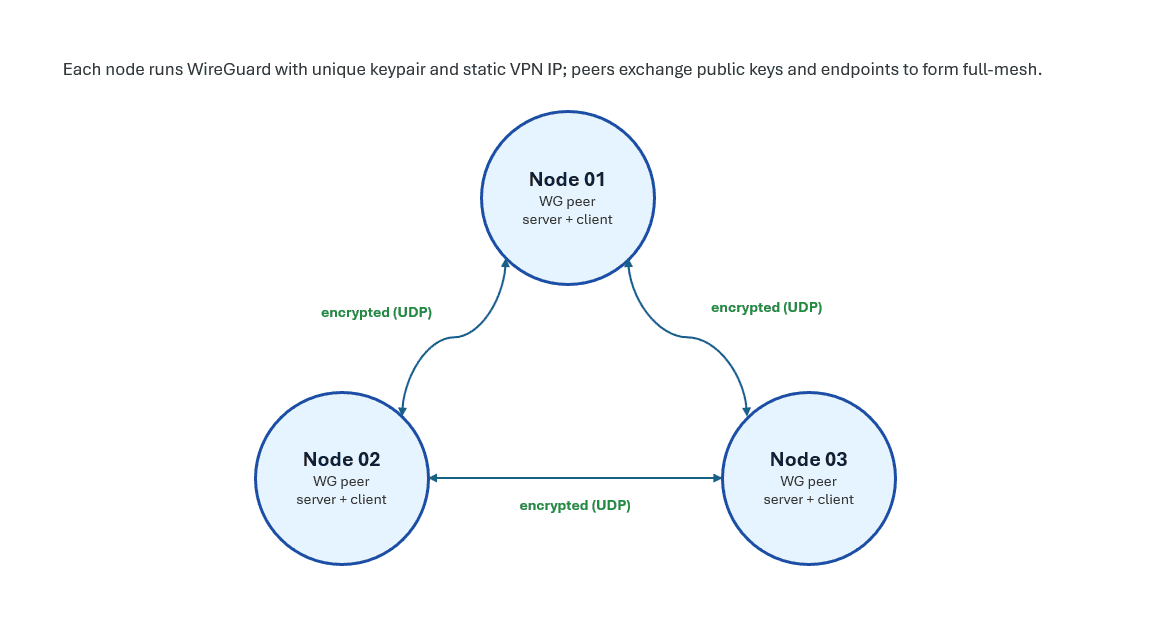
Each connection is:
- Encrypted with WireGuard’s NoiseIK-based protocol
- UDP-only (default port 51820)
- Stateless and peer-to-peer
2. Step-by-Step Instructions
Below are the full steps for installing and configuring the WireGuard network.
Step 1 — Install WireGuard
On each node:
sudo dnf install wireguard-toolsThis installs:
wg: low-level WireGuard control binarywg-quick: convenience wrapper for interface management- systemd integration
Step 2 — Generate Key Pairs
Each node must have its own private/public key pair.
wg genkey | tee privatekey | wg pubkey > publickeyThis produces two files:
privatekey— keep secretpublickey— shared with other peers
WireGuard uses Curve25519 keys and does not require certificates, simplifying cluster bootstrapping.
Step 3 — Create WireGuard Configuration Files
Each node uses /etc/wireguard/wg0.conf.
Configuration Explained
-
[Interface]Defines this machine’s VPN IP, private key, and listening UDP port. -
[Peer]Defines a remote WireGuard node:PublicKey: the peer’s public keyEndpoint: the peer's public IP + WireGuard portAllowedIPs: routing rules (acts as both ACL and static route)PersistentKeepalive: required for NAT traversal
The following are complete sample configurations.
node01 — /etc/wireguard/wg0.conf
[Interface]
Address = 10.0.0.1/24
PrivateKey = <node01 private key>
ListenPort = 51820

# node02
[Peer]
PublicKey = <node02 public key>
Endpoint = <node02 public IP>:51820
AllowedIPs = 10.0.0.2/32
PersistentKeepalive = 25

# node03
[Peer]
PublicKey = <node03 public key>
Endpoint = <node03 public IP>:51820
AllowedIPs = 10.0.0.3/32
PersistentKeepalive = 25
node02 — /etc/wireguard/wg0.conf
[Interface]
Address = 10.0.0.2/24
PrivateKey = <node02 private key>
ListenPort = 51820

# node01
[Peer]
PublicKey = <node01 public key>
Endpoint = <node01 public IP>:51820
AllowedIPs = 10.0.0.1/32
PersistentKeepalive = 25

# node03
[Peer]
PublicKey = <node03 public key>
Endpoint = <node03 public IP>:51820
AllowedIPs = 10.0.0.3/32
PersistentKeepalive = 25
node03 — /etc/wireguard/wg0.conf
[Interface]
Address = 10.0.0.3/24
PrivateKey = <node03 private key>
ListenPort = 51820

# node01
[Peer]
PublicKey = <node01 public key>
Endpoint = <node01 public IP>:51820
AllowedIPs = 10.0.0.1/32
PersistentKeepalive = 25

# node02
[Peer]
PublicKey = <node02 public key>
Endpoint = <node02 public IP>:51820
AllowedIPs = 10.0.0.2/32
PersistentKeepalive = 25
Step 4 — Open Firewall Port
WireGuard uses UDP 51820 by default.
sudo firewall-cmd --add-port=51820/udp --permanent
sudo firewall-cmd --reload
If using iptables or nftables, expose the same UDP port.
Step 5 — Enable the WireGuard Interface
sudo systemctl enable --now wg-quick@wg0Check status:
sudo wgExample output:
interface: wg0
  public key: xxxxx
  listening port: 51820

peer: yyyyy
  endpoint: 203.xxx.xxx.xxx:51820
  allowed ips: 10.0.0.2/32
  latest handshake: 5 seconds ago
Once you see a handshake, the P2P tunnel is established.
Step 6 — Enable Packet Forwarding
For full-mesh routing, Linux must allow forwarded packets.
Temporary change:
sudo sysctl -w net.ipv4.ip_forward=1Persistent configuration:
sudo mkdir -p /etc/sysctl.d
echo "net.ipv4.ip_forward=1" | sudo tee /etc/sysctl.d/99-ipforward.conf
sudo sysctl --system
This is essential for:
- MPI multi-node jobs
- BeeGFS traffic
- Slurm control → compute node traffic
- Cross-node container runtimes
Step 7 — Add Hostnames for Convenience
On each node, edit /etc/hosts:
10.0.0.1 node01
10.0.0.2 node02
10.0.0.3 node03
This allows:
ping node02
ssh node03
—without relying on DNS.
Step 8 — Test Connectivity
On each node, test all links:
Example from node01:
ping -c3 node02
ping -c3 node03
All combinations should succeed.
This confirms the full-mesh is operational.
3. Why Full-Mesh WireGuard for HPC?
A cluster VPN like this offers several benefits:
1. Uniform, predictable private network
Even across multiple VPS providers or mixed environments.
2. Encrypted HPC node traffic
Protects Slurm RPC, BeeGFS metadata, credentials, and MPI traffic.
3. Independence from provider networking
Useful when:
- No VPC/VNet equivalent exists
- NAT prevents inbound connectivity
- Private IPv4 is unavailable
- Carrier-grade NAT hides real IP addresses
WireGuard’s NAT traversal makes all nodes routable.
4. Easily scalable
Adding a new node only requires distributing its public key and adding peers.
5. Ideal foundation for:
| Component | Benefit |
|---|---|
| BeeGFS | Stable interfaces for storage nodes, metadata servers, management nodes |
| Slurm | Clear separation between cluster internal traffic and public SSH |
| MPI | Low-latency encrypted paths; predictable IP ranges |
| Ansible | Inventory based on internal addresses |
| Monitoring / Grafana | Unified internal endpoints |
